Easy Decorated Spring cookies decorated: A Complete Step-by-Step Guide for Beginners
Published:
Updated:
Author:
with this Ultimate Spring Cookies Decorated Guide These cookies are a Must-Try for anyone who wants a Quick & Simple baking project or an Aesthetic & Style focused dessert, to serve at an Occasion & Vibe such as Easter or garden party. Spring is a time for new beginnings, and few things showcase that more than a box of buttery, crisp cookies decorated with pastel icing and floral designs.
This Complete Guide is for those who want professional quality results without the outlay. I hope that was useful — my very own healthy REESE’S Peanut Butter Cup Cookie! From the Why of a perfect dough chill to the How of intricate piping, our Step-by-Step approach makes this a great Weeknight activity for families or solitary bakers. These Best-in-class sweets are not simply desserts; they are mouthwatering art pieces that celebrate the bright colors of fall.
Our Best one spring cookies decorated Royal Icing Decorated Spring Cookies
Ingredients
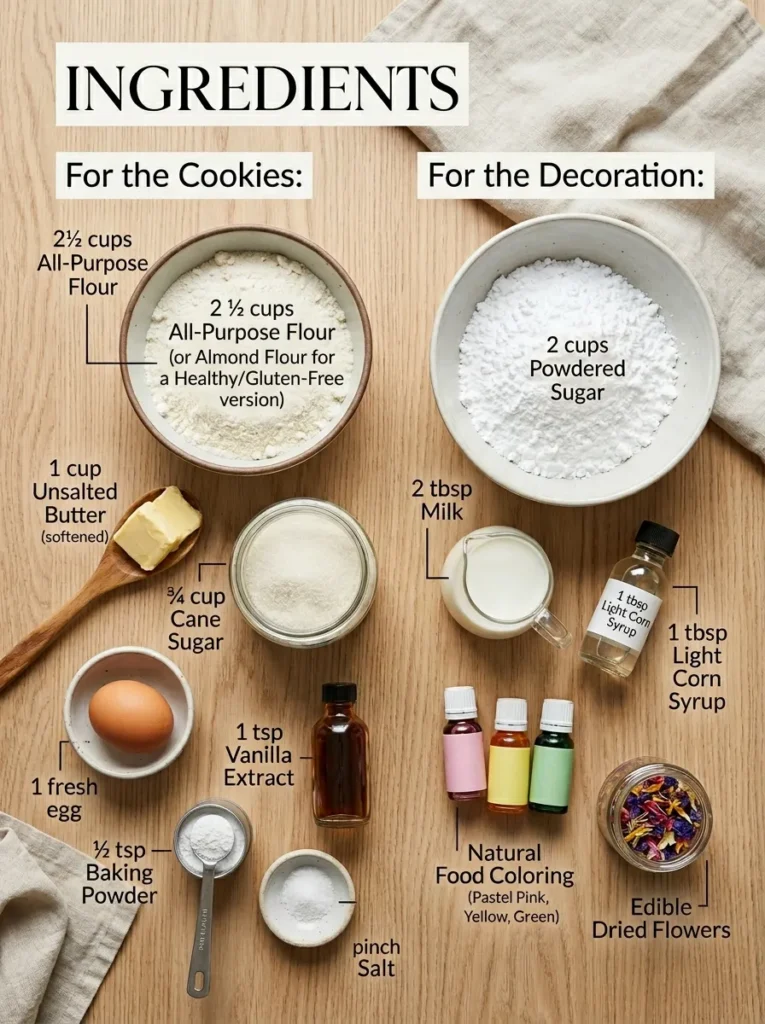
- For the Cookies:
- 2 ½ cups All-Purpose Flour (or Almond Flour for a Healthy/Gluten-Free version)
- , 1 cup Unsalted Butter (softened),
- ¾ cup Cane Sugar,
- 1 Egg,
- 1 tsp Vanilla Extract,
- ½ tsp Baking Powder,
- a pinch of Salt.
- For the Decoration:
- 2 cups Powdered Sugar,
- 2 tbsp Milk,
- 1 tbsp Light Corn Syrup (for shine),
- Natural Food Coloring (Pastel pink, yellow, and green),
- Edible Dried Flowers (optional).
Step-by-Step Instruction
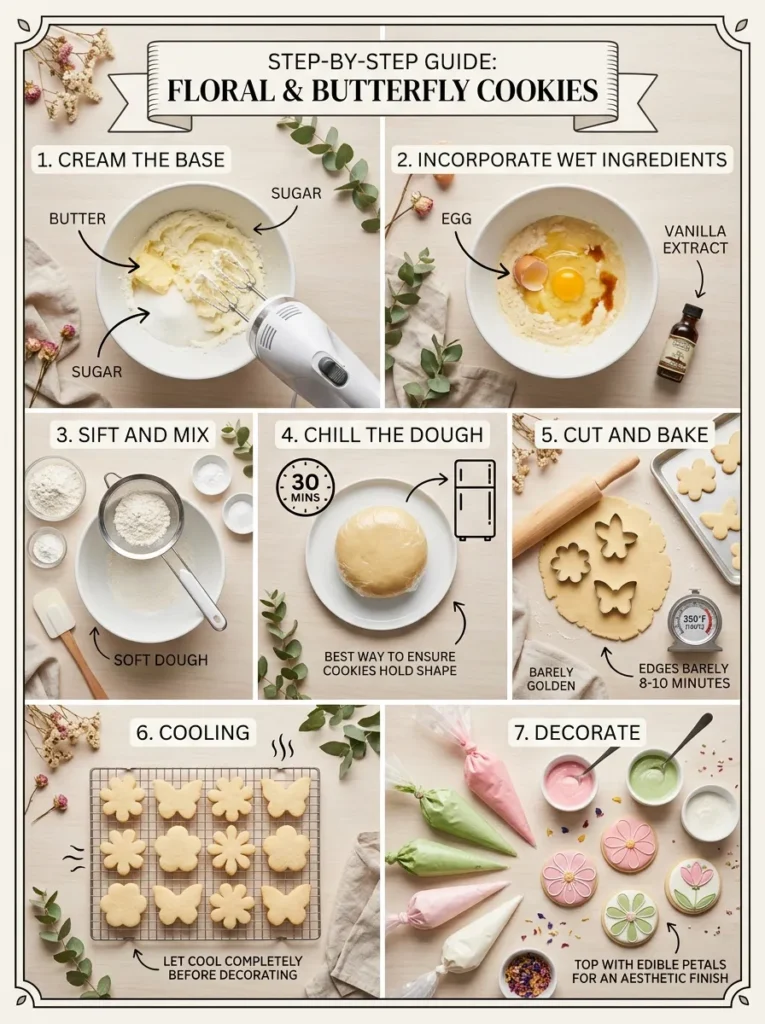
- Cream the Base:
- In a large bowl, cream the softened butter and sugar together until light and fluffy.
- Incorporate Wet Ingredients:
- Add the egg and vanilla extract, beating until well combined.
- Sift and Mix:
- Gradually fold in the flour, baking powder, and salt. Mix until a soft dough forms.
- Chill the Dough:
- Wrap the dough and refrigerate for at least 30 minutes. This is the Best way to ensure the cookies hold their shape.
- Cut and Bake:
- Roll the dough to ¼ inch thickness. Use flower or butterfly cutters. Bake at 350°F (180°C) for 8-10 minutes until edges are barely golden.
- Cooling:
- Let the cookies cool completely on a wire rack before decorating.
- Decorate:
- Mix the icing ingredients. Divide and color. Pipe floral outlines and flood the center. Top with edible petals for an Aesthetic finish.
Top 10 Variations
Here are the detailed Top 10 Variations for Spring Cookies Decorated with specific ingredients and a serial-style instruction guide, designed for high engagement on and Google Discover.
1. Drip Glaze Cookies (Soft Pastel Drip)
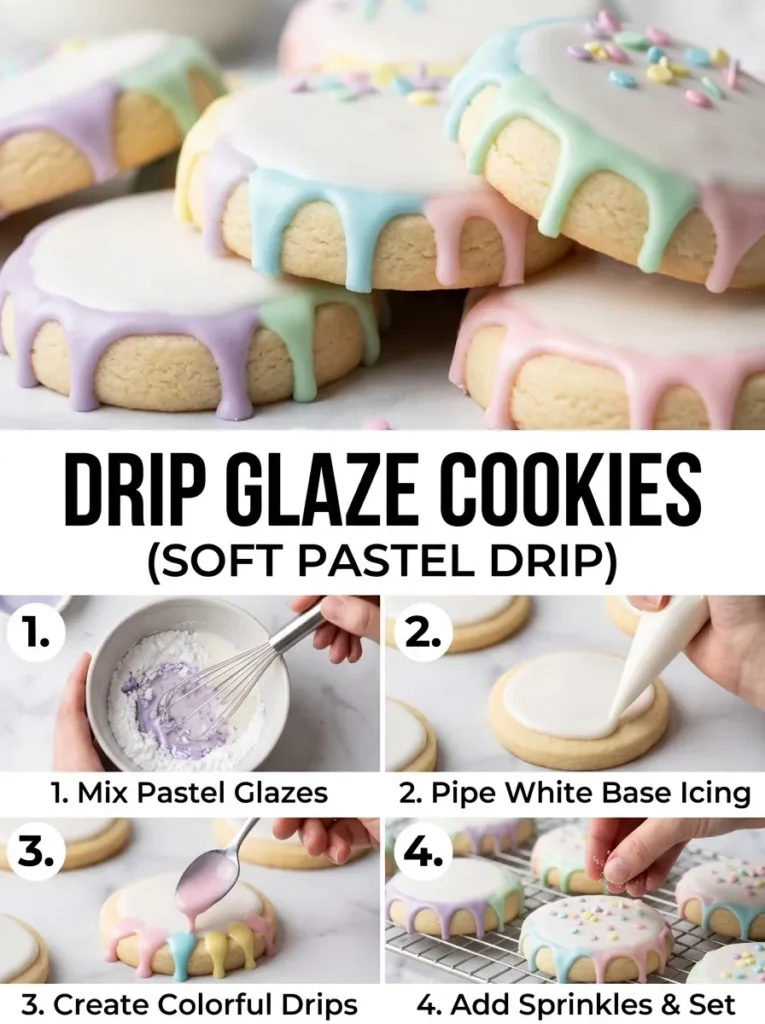
Ingredients
- Sugar cookies (baked & cooled)
- Powdered sugar (1 cup)
- Milk (2–3 tbsp)
- Food coloring (pastel shades)
- White icing (for drip)
Steps
- Mix powdered sugar + milk → smooth glaze.
- Divide into bowls, add pastel colors.
- Dip cookie tops into glaze → let dry.
- Add slightly thicker white icing in piping bag.
- Pipe along edge and let it drip naturally.
- Dry completely (1–2 hours).
2. Sprinkle-Loaded Spring Cookies
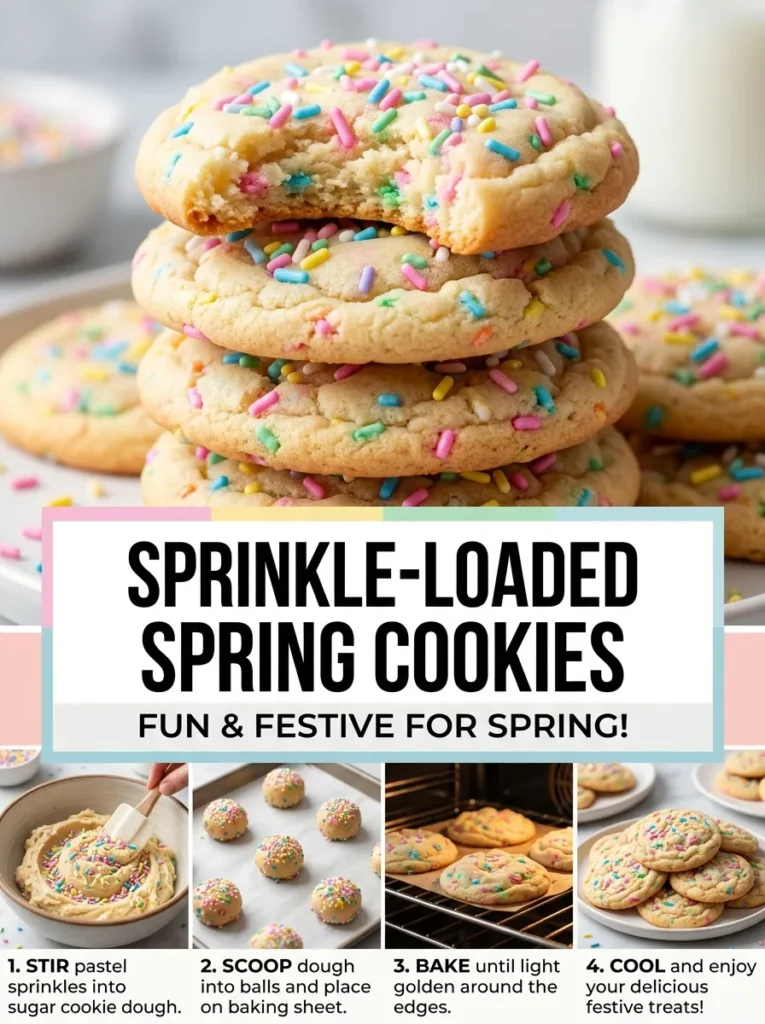
Ingredients
- Sugar cookie dough
- Mixed pastel sprinkles
- Royal icing (optional)
Steps
- Roll dough balls and coat fully in sprinkles.
- Bake at 175°C for 10–12 minutes.
- Optional: drizzle icing on top.
- Cool and serve.
3. Macaron-Style Sandwich Cookies
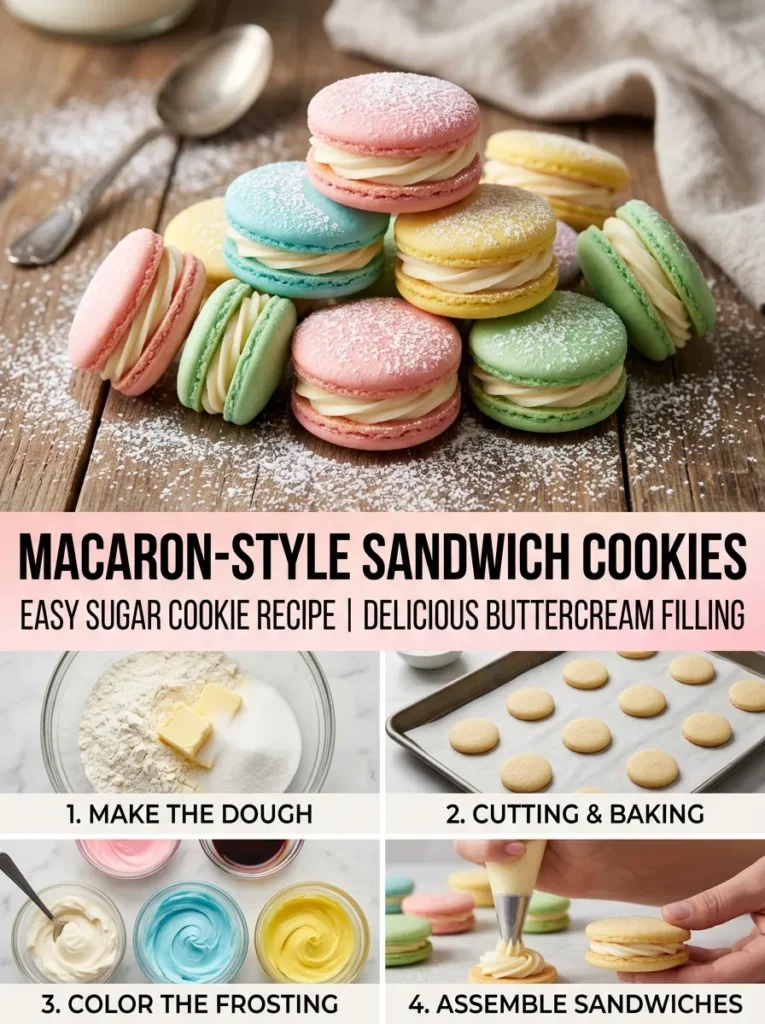
Ingredients
- Two small sugar cookies per sandwich
- Buttercream frosting (butter + sugar + vanilla)
- Food coloring
Steps
- Bake small round cookies.
- Make buttercream and color it pastel.
- Pipe filling onto one cookie.
- Sandwich with another cookie.
- Chill 15 minutes for best texture.
4. Plaid Pastel Cookies
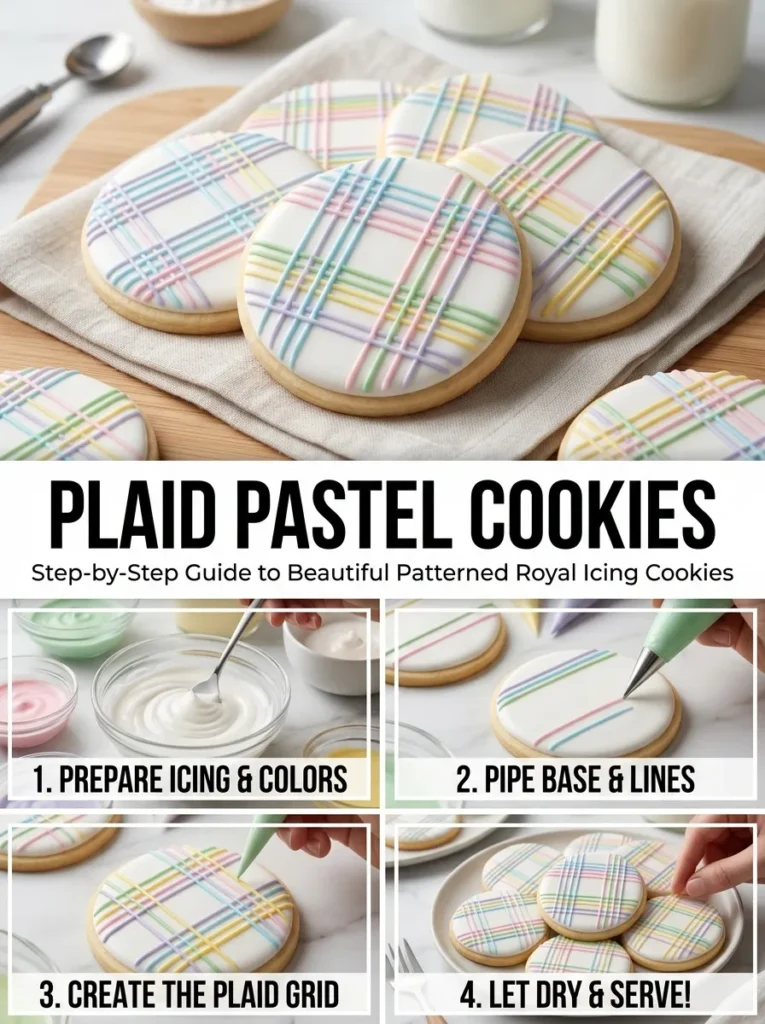
Ingredients
- Royal icing (white + pastel colors)
- Piping bags
Steps
- Flood cookie with base pastel icing.
- Let dry completely.
- Pipe thin horizontal & vertical lines.
- Add cross-lines in different colors.
- Let set.
5. Abstract Brushstroke Cookies
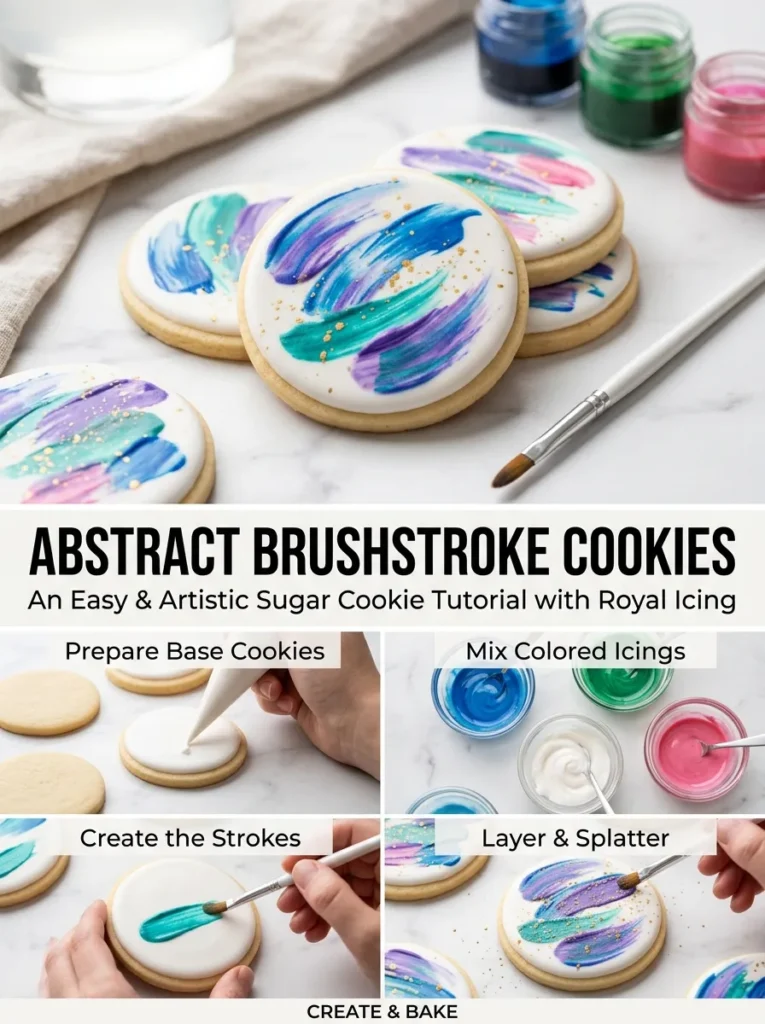
Ingredients
- Royal icing base
- Gel food colors
- Clean food-safe brushes
Steps
- Flood cookie with white icing.
- Let dry fully.
- Dip brush in color + lightly stroke cookie.
- Layer multiple colors for abstract look.
- Let dry.
6. Confetti Cookies (Inside + Outside)
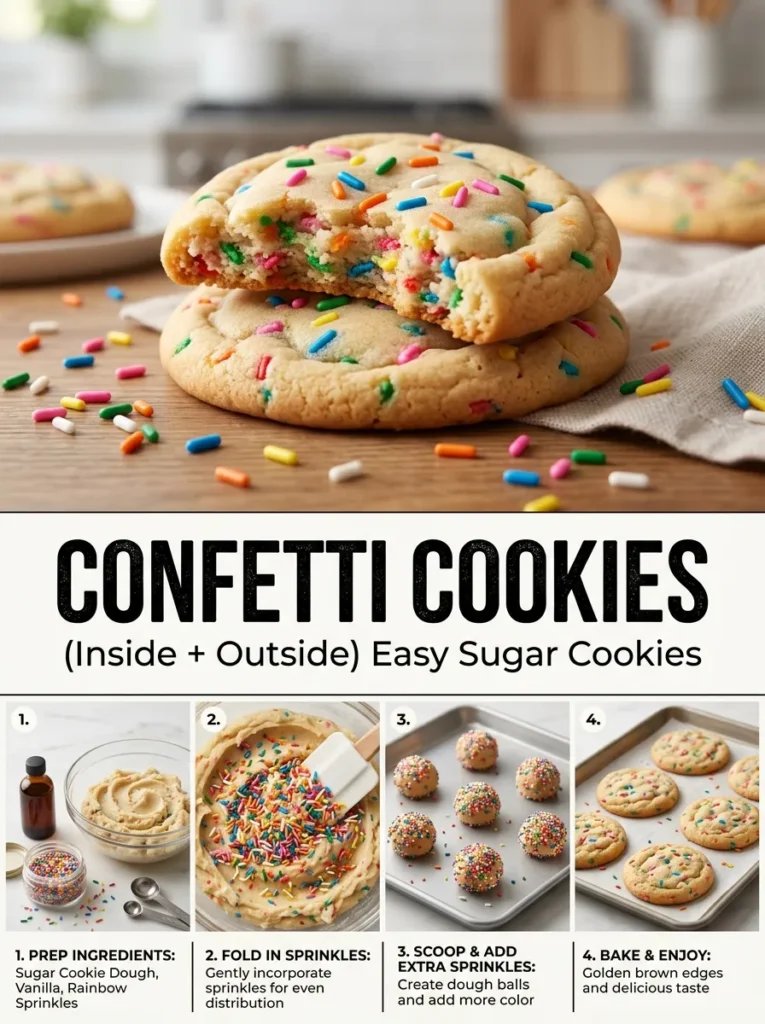
Ingredients
- Sugar cookie dough
- Rainbow sprinkles
- Vanilla extract
Steps
- Mix sprinkles directly into dough.
- Roll dough balls → coat in more sprinkles.
- Bake 10–12 minutes.
- Cool and enjoy colorful inside texture.
7. Monogram Spring Cookies
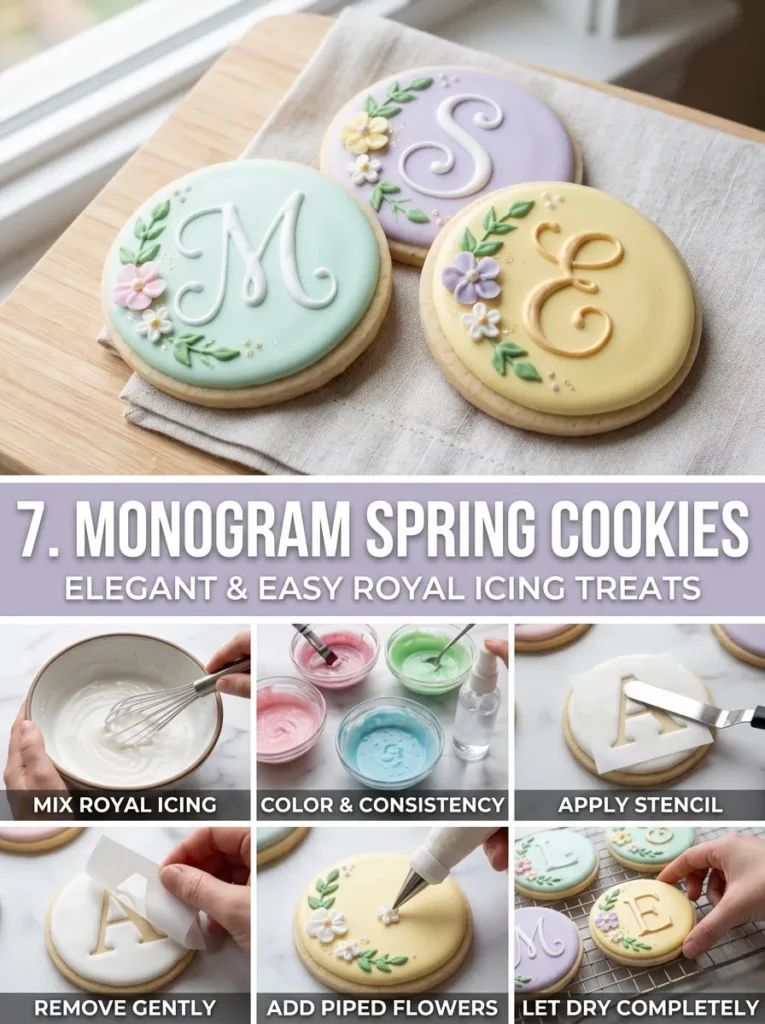
Ingredients
- Royal icing (base + piping consistency)
- Letter stencils (optional)
Steps
- Flood cookies with pastel icing.
- Let dry completely.
- Pipe initials using thin tip OR stencil.
- Add tiny floral accents if desired.
- Dry.
8. Lace-Detail Cookies

Ingredients
- Royal icing (white + soft pastels)
- Fine piping tip (#1 or #2)
Steps
- Base coat cookie with soft color.
- Let dry.
- Pipe tiny loops, dots, and swirls like lace.
- Work slowly for detail.
- Let dry overnight.
9. Polaroid-Style Decorated Cookies

Ingredients
- White royal icing
- Food-safe markers or edible paint
Steps
- Outline cookie like a Polaroid frame (thick bottom edge).
- Flood with white icing.
- Let dry.
- Draw mini spring scenes (flowers, sky).
- Add tiny caption text.
10. Boho Spring Cookies (Earthy Tones)
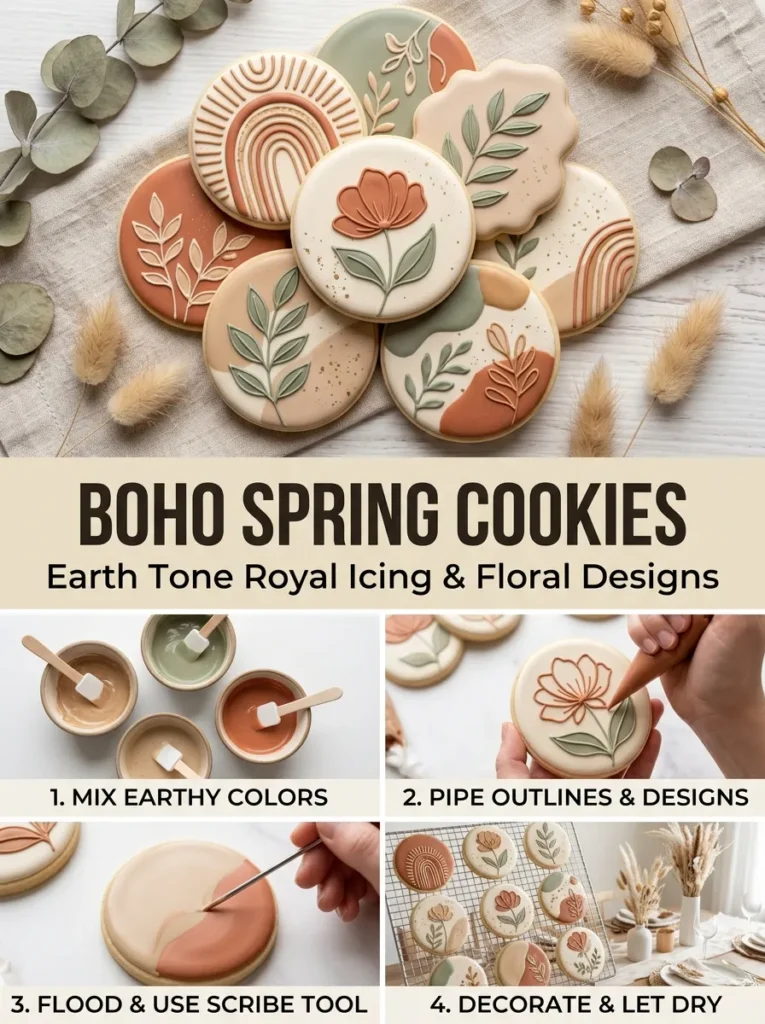
Ingredients
- Royal icing (beige, terracotta, sage, cream)
- Toothpicks or scribe tool
Steps
- Flood cookie with neutral base color.
- Add dots/lines in different tones while wet.
- Use toothpick to drag patterns (feather, waves).
- Let dry for natural boho texture.
Nutritional Benefits
- Controlled Sugar: By baking at home, you reduce processed additives found in store-bought cookies.
- Mood Booster: Baking and decorating are proven to reduce stress and improve mental clarity.
- Antioxidants: Using natural colorings like turmeric (yellow) or beet powder (pink) adds a small boost of phytonutrients.
FAQs
1. What is the best type of cookie for decorating?
The most popular choice is a classic sugar cookie because it provides a flat, sturdy surface and holds its shape during baking.
2. What kind of icing should I use for intricate spring designs?
Royal icing is the gold standard for detailed decorating. It is prized because it dries to a smooth, hard finish, making it perfect for stacking or gifting.
3. How do I get vibrant spring colors?
Use gel food coloring instead of liquid drops. Gels provide intense, consistent color without watering down your icing consistency. Soft pastels can be achieved by adding just a tiny amount of gel with a toothpick.]
4. What supplies do I need to get started?
Essential supplies for beginners include:
- Disposable piping bags or Ziploc bags.
- Gel food coloring in various spring shades.
- Icing tips and couplers (specifically a small round tip like #2 for outlines).
- Toothpicks or a cookie scribe for popping bubbles and moving icing into corners.
5. How do I prevent my cookies from spreading while baking?
Chilling the dough is critical. Refrigerate your dough for at least one hour before rolling it out to help the cookies maintain their sharp, cut-out edges.
6. What are some easy spring decorating ideas for beginners?
- One-Shape Flowers: Use a single petal-shaped cutter to create various flower designs using only one icing consistency.
- Pastel Palettes: Use soft pinks, yellows, and baby blues for umbrellas, rainboots, or sunshine shapes.
- Moss Texture: Use crushed graham crackers or green-tinted royal icing “moss” for a rustic garden look.
7. What is “flooding” in cookie decorating?
Flooding is a technique where you use a thinner consistency of icing to fill in the center of an outlined cookie. First, pipe a thick border (outline) to act as a dam.
8. How long does it take for decorated cookies to dry?
Royal icing typically needs several hours to dry completely, depending on humidity. For best results, let them sit out overnight before stacking or packaging to ensure the icing is hard all the way through.
9. Can I decorate cookies with kids?
Absolutely! For a mess-free option, you can buy pre-baked cookie kits that include cookies, icing bags, and sprinkles. Using “wet-on-wet” techniques—dropping dots of one color into another.
10. How should I store my finished cookies?
Store decorated cookies in an airtight container at room temperature. Avoid the refrigerator, as the humidity can cause the icing to soften or the colors to bleed.
11. Can I freeze decorated cookies?
Yes, you can freeze decorated cookies for up to two months. To prevent condensation from ruining the icing when thawing, let the container reach room temperature completely before opening it.
12. Where can I learn advanced techniques?
Many local bakers and community centers offer spring-themed decorating classes where you can learn professional “tricks of the trade” like piping fine details and using stencils.
Final Thought
Celebrate the warmer months with perfectly decorated Spring Cookies. This recipe is not merely about flavor — it’s about the experience of making something Aesthetic & Style driven that elicits joy from others. By following our Step-by-Step, you’ve conquered the perfect bake from an initial chill of the dough to finishing touches of delicate leaves.
These are versatile little cookies for any Occasion & Vibe, whether you’re hosting an elegant tea party or want a Healthy, mindful treat to send the kids off with. Combine a Quick & Simple process with high-quality ingredients and these are guaranteed to be a Weeknight favorite every year when those first flowers start peeking through the soil. Just remember the best part of baking is the creativity it inspires. So, share these treats with neighbors, friends or family to help spread the vibrant mood of spring. Your kitchen is now a studio, and these cookies are your work of art!
Leave a Reply