
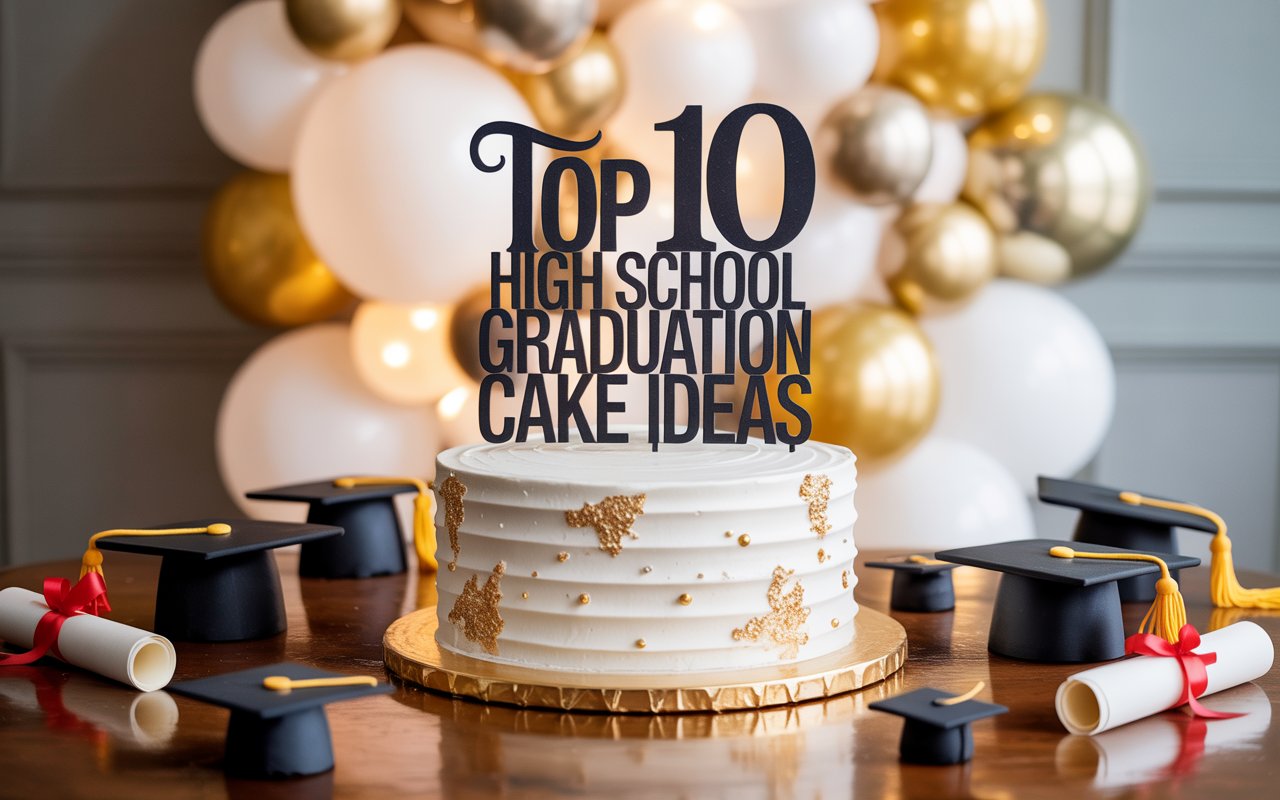
Graduating high school is an exciting time deserving of a fabulous cake to celebrate the occasion. No matter if it’s a small family get-together or a large bash with friends and classmates, the right graduation cake will add sweetness to the occasion while also capturing the graduate’s personality and accomplishments.
The following are the 10 most popular high school graduation cake ideas to make your party a success.
Classic Cap and Diploma Cake
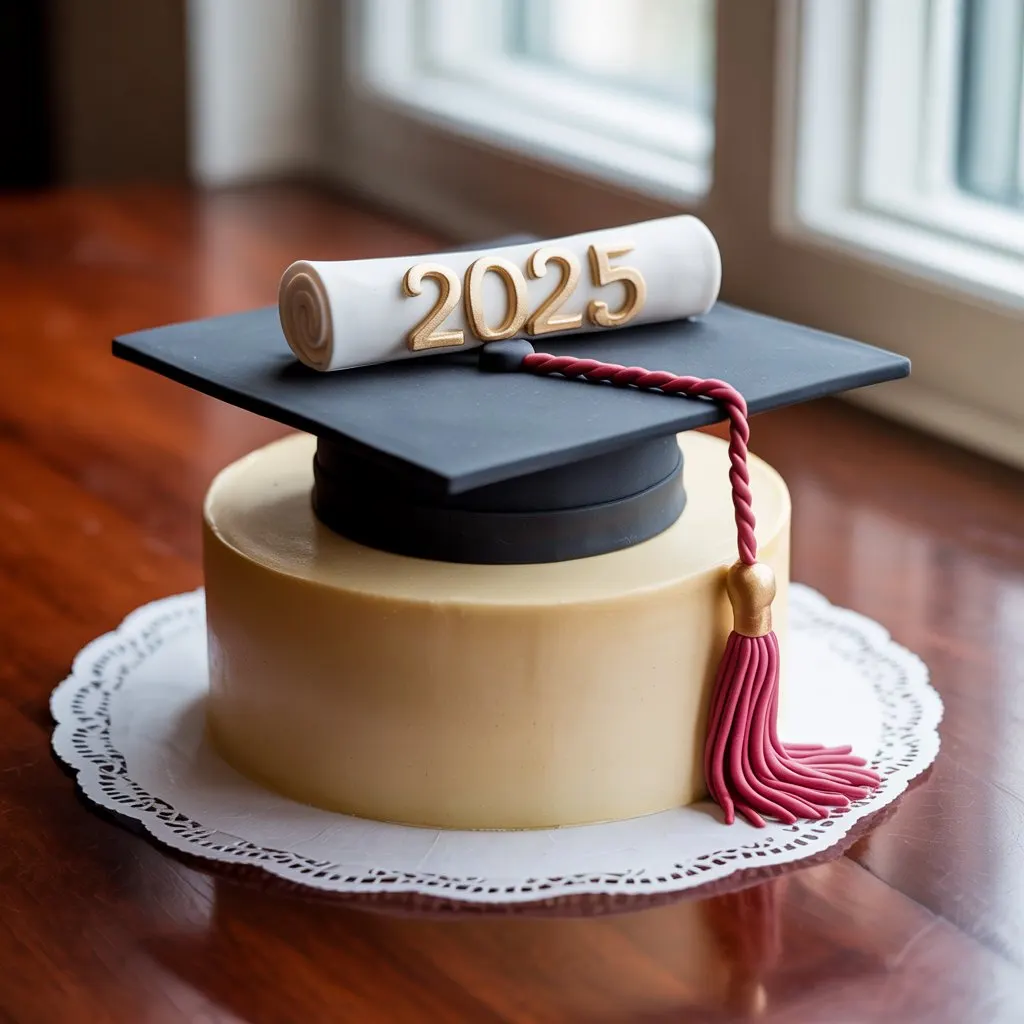
Here’s a timeless Classic Cap and Diploma Cake design perfect for celebrating graduations! This cake combines symbolic elements with elegant simplicity, making it ideal for honoring academic achievements 🎓🍰.
Classic Cap and Diploma Cake
Prep Time: 1 hour (plus baking/cooling)
Decorating Time: 1–2 hours
Serves: 12–16
Ingredients:
Cake Base:
- 3-layer vanilla, chocolate, or red velvet cake (8″ or 9″ rounds)
- Buttercream frosting (vanilla or chocolate, tinted school colors if desired)
- Fondant (black, gold, and white)
- Edible gold paint or luster dust (for detailing)
Decorations:
- Graduation cap (mortarboard): Black fondant shaped into a square with a tassel.
- Diploma scroll: White fondant rolled into a tube, tied with a gold fondant ribbon.
- 2025 plaque: Gold fondant cut into a rectangle with the graduation year piped in black icing.
- Academic accents: Mini fondant books, stars, or school mascot (optional).
Design Steps:
- Bake & Frost the Cake:
- Bake and cool your chosen cake layers. Stack and crumb-coat with buttercream. Chill for 30 minutes.
- Apply a final smooth layer of buttercream. Use school colors (e.g., navy and gold) for the frosting if desired.
- Create the Graduation Cap:
- Roll black fondant into a 4×4″ square for the mortarboard.
- Shape a small fondant ball for the cap button, attach a gold-tinted tassel (use fondant strands or edible string).
- Let dry on a foam pad to hold its shape.
- Make the Diploma Scroll:
- Roll white fondant into a thin rectangle (6×3″). Roll it into a tube and pinch the ends.
- Create a tiny gold fondant ribbon to wrap around the center.
- Assemble the Toppers:
- Place the cap slightly off-center on the cake. Position the diploma next to it.
- Add the “2025” plaque nearby. Pipe “Congratulations!” or the graduate’s name in buttercream.
- Add Finishing Touches:
- Use edible gold paint to highlight edges of the cap, diploma, or plaque.
- Scatter gold sprinkles or fondant stars around the base for sparkle.
Customization Ideas:
- School Colors: Dye buttercream or fondant to match the graduate’s school (e.g., crimson and cream for USC, orange and blue for UF).
- Themed Layers: Add a “bookstack” tier with fondant books labeled with the graduate’s major.
- Photo Accent: Print an edible image of the graduate in their cap and gown.
- 3D Elements: Use a cake topper of a graduation cap or a figurine holding a diploma.
Tips for Success:
- Stability: Use dowels or straws in tiered cakes to support the weight of fondant decorations.
- Time-Saver: Bake cakes and make fondant decorations a day ahead; assemble the day of.
- Texture: Add a “satin” finish to the buttercream by smoothing with a hot offset spatula.
- Allergies: Substitute fondant with modeling chocolate for a nut-free option.
This cake is a heartfelt way to celebrate a graduate’s hard work and achievements. Pair it with a heartfelt card or a custom graduation cap cookie for a memorable gift! 🎉📜
Image idea: A sleek white frosted cake with a glossy black fondant cap, gold-tassel diploma, and delicate gold accents.
Honor traditional graduation symbols with a cake in the shape of a cap and diploma. This classic design is a mortarboard cake with a fondant tassel and a rolled diploma with an edible ribbon. Personalize it with the school colors or the graduate’s name for a little rah-rah-rah.
School Colors Theme Cake
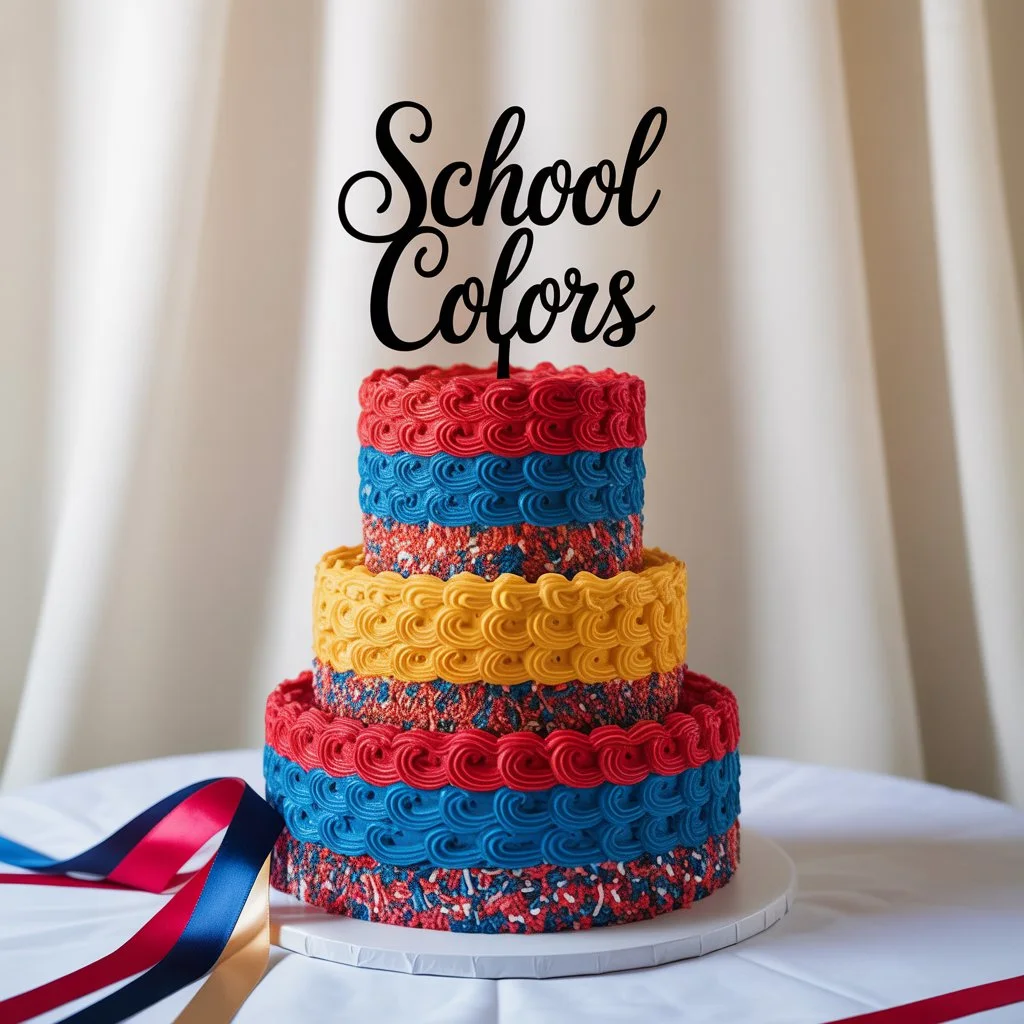
Here’s a vibrant School Colors Theme Cake design that’s perfect for celebrating school pride, graduations, sports victories, or alumni events! This customizable cake lets you showcase team or school colors in a bold, eye-catching way 🎓🏈🎉.
School Colors Theme Cake
Prep Time: 1.5 hours (plus baking/cooling)
Decorating Time: 1–2 hours
Serves: 12–16
Ingredients:
Cake Base:
- 3-layer vanilla, chocolate, or Funfetti cake (8″ or 9″ rounds)
- Buttercream frosting (vanilla or cream cheese, divided and tinted school colors)
- Food coloring gels (school-specific colors, e.g., navy + gold, crimson + cream)
- Fondant (optional, for accents or mascot toppers)
Decorations:
- Edible glitter or sprinkles (in school colors)
- Chocolate melts or candy molds (shaped like school mascots, footballs, etc.)
- Piping tips (star, round, or basketweave for textured designs)
- Edible ink markers (for writing slogans or names)
Design Steps:
- Bake & Color the Layers:
- Divide the cake batter into bowls and dye portions with school colors (e.g., maroon and white layers for Texas A&M). Bake and cool.
- Stack layers with matching or contrasting buttercream (e.g., alternate maroon and white frosting between red velvet layers).
- Crumb Coat & Chill:
- Apply a thin crumb coat of neutral buttercream. Chill for 30 minutes.
- Frost with School Colors:
- Two-Tone Design: Split frosting into school colors. Use an offset spatula to apply one color on the top half and another on the bottom. Blend gently at the middle for an ombre effect.
- Stripes or Polka Dots: Pipe vertical stripes or dots with a round tip using alternating colors.
- Mascot Accent: Mold fondant into the school mascot (e.g., a tiger, bulldog) or use pre-made chocolate molds.
- Add Text & Details:
- Pipe the school’s name, motto, or graduation year in buttercream.
- Use edible ink markers to draw logos or write messages on fondant plaques.
- Finishing Touches:
- Press sprinkles or edible glitter along the base or top edges.
- Add chocolate symbols (e.g., mini graduation caps, footballs) or fondant pennants.
Customization Ideas:
- Team Spirit: Add a “field” tier with green buttercream grass for sports-themed cakes.
- Grad Celebration: Top with a fondant graduation cap and diploma in school colors.
- Alumni Pride: Pipe the graduation year alongside the school’s founding date.
- Ruffle Layers: Use a petal tip to create ruffled tiers in alternating colors.
Pro Tips:
- Color Intensity: Use gel food coloring (not liquid) for vibrant hues without thinning the frosting.
- Smooth Finish: For sharp edges, chill the cake between frosting layers and use a bench scraper.
- Allergy-Friendly: Substitute with vegan buttercream or gluten-free cake mix if needed.
- Time-Saver: Use boxed cake mix dyed with school colors, and focus on decorating!
Example Color Palettes:
- University of Michigan: Maize + Blue
- Harvard: Crimson + Black
- Notre Dame: Navy + Gold
- Oregon: Green + Yellow
This cake is a delicious way to honor school pride! Pair it with cookies iced in matching colors or a themed charcuterie board for a full celebration spread 🎉🏆.
Image idea: A sleek navy and gold cake with a fondant mascot, piped chevron stripes, and edible glitter accents.
Show your school spirit with a cake adorned with the graduate’s high school colors. Think tall stripes, swirls and other patterns in complementary shades of frosting. You can even take things a step further by plopping on the school’s mascot or logo as a cake topper.
Idea Add-On:
Attach a note to the cake that wishes the graduate well, for example “Congrats, Emily!” in edible glitter.
Books Stack Cake

Here’s a whimsical yet sophisticated Books Stack Cake design, perfect for celebrating book lovers, graduations, retirements, or library-themed parties! This cake mimics a stack of classic hardcover books with intricate edible details—ideal for literary enthusiasts and academic milestones 📚🎂✨.
Books Stack Cake
Prep Time: 2 hours (plus baking/cooling)
Decorating Time: 3–4 hours
Serves: 15–20
Ingredients:
Cake Base:
- 3–4 rectangular cakes (9×5” loaf pans or 8×4” tiers, vanilla, chocolate, or red velvet)
- Buttercream frosting (vanilla or chocolate, for filling and crumb coat)
- Fondant (white, black, and assorted colors for book covers)
- Edible food coloring pens (black, gold, or metallic)
Decorations:
- Edible glue (or light corn syrup)
- Gold/silver luster dust (for metallic accents)
- Edible parchment paper (optional, for “pages”)
- Fondant tools (rolling pin, exacto knife, embossing tools)
Optional Add-Ons:
- Mini fondant accessories: glasses, quill pen, teacup, or apples
- Edible glitter for “magic” book vibes
- Printed edible paper for realistic book titles
Design Steps:
- Bake & Shape the Books:
- Bake rectangular cakes in loaf pans or carve rectangular tiers from sheet cakes. Level and chill.
- Stack layers with buttercream filling, alternating flavors if desired. Crumb coat the entire cake and chill for 1 hour.
- Cover with Fondant “Pages”:
- Roll white fondant into large sheets. Drape over the cake sides to create the “page edges” of the books. Smooth and trim excess.
- Use a veining tool or knife to lightly score horizontal lines on the fondant for a textured “paper” look.
- Create the Book Covers:
- Roll colored fondant into rectangles (size depends on tier height). Attach to the front of each “book” with edible glue.
- Add details:
- Spine: Use a ruler and food pen to draw lines, titles, or faux author names (e.g., “The Great Novel” by Baker Extraordinaire).
- Embellishments: Add fondant flourishes, gold-dusted borders, or tiny fondant bookmarks peeking out.
- Add Realistic Textures:
- Embossing: Press fondant with a textured rolling pin (woodgrain, linen) for vintage book covers.
- Aging: Dust edges with cocoa powder or brown food coloring for an antique look.
- Top with Accessories:
- Place mini fondant glasses, a quill pen, or a teacup on the highest tier.
- Add a fondant apple for a teacher-themed cake.
- Finishing Touches:
- Brush gold luster dust on titles or edges for elegance.
- Pipe buttercream “pages” along the sides or add crumpled edible parchment.
Customization Ideas:
- Favorite Books: Replicate spines of beloved novels (e.g., Harry Potter, Pride and Prejudice).
- Graduation Theme: Label books with subjects like “Math,” “History,” or “Diploma 2025.”
- Children’s Party: Use bright colors and fondant cartoon characters (e.g., Very Hungry Caterpillar).
- Anniversary Gift: Add fondant “love letters” or titles like Our Story.
Pro Tips:
- Stability: Insert dowels or cardboard between tiers for support.
- Edible Ink: Print custom book titles on edible paper for precision.
- Vegan/GF: Use vegan buttercream and gluten-free flour.
- Time-Saver: Bake cakes and prep fondant decorations a day ahead.
Serving Suggestions:
- Pair with book-shaped cookies or library card cupcakes.
- Display on a wooden board with real books and faux greenery.
This cake is a literary masterpiece that’s sure to impress! Whether for a graduation, birthday, or book club finale, it’s a delicious nod to the magic of reading 📖🍰.
Image idea: A tiered cake resembling three antique books with gold-embossed spines, a fondant quill on top, and “pages” spilling out the sides.
Choose a cake in the shape of a stack of books for the bookworm or academic high achiever. Each book can be a subject the graduate enjoyed, their future planned college major or, even, hobbies they like. The level of details in these cakes are jaw-dropping and will surely wow your guests.
Bonus Feature:
Add an edible quote or image from your graduates favorite books!
Graduation Year Cake
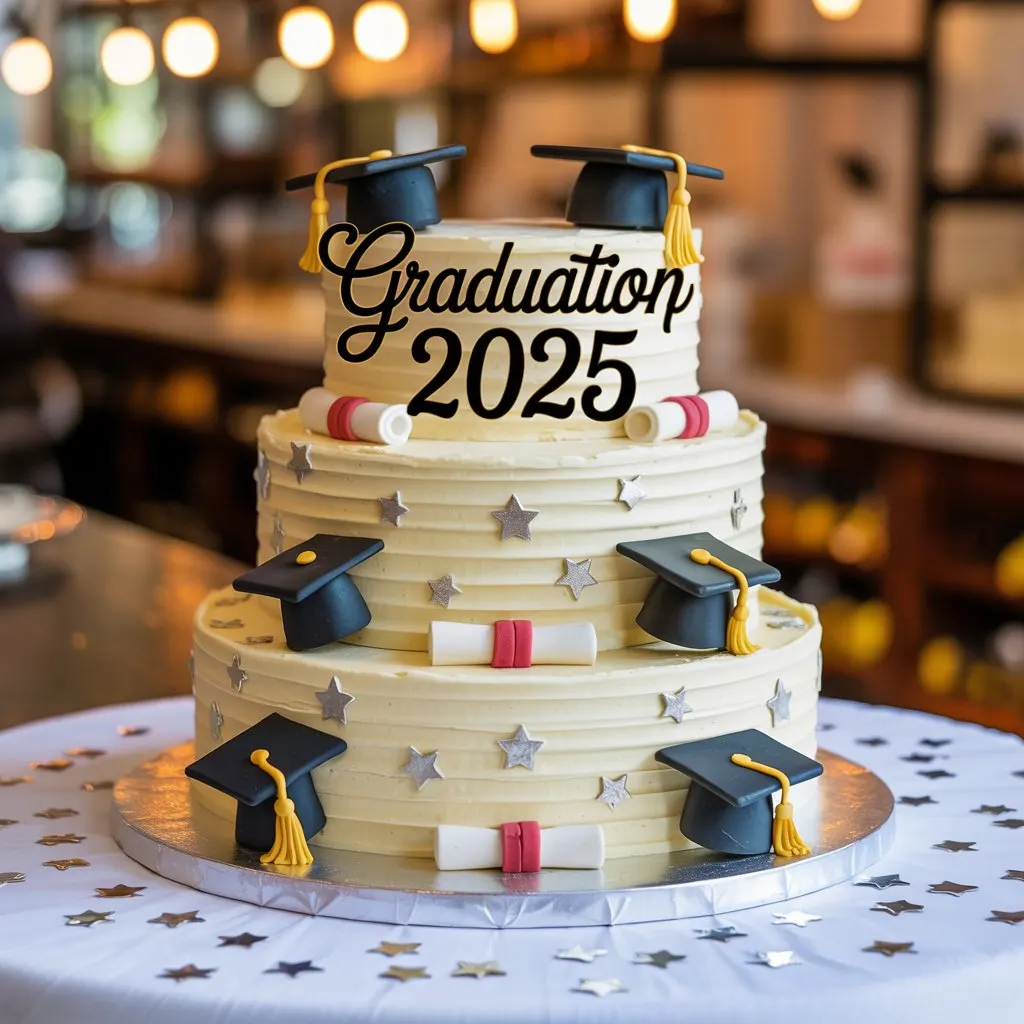
Here’s a celebratory Graduation Year Cake design that puts the spotlight on the milestone year (like 2025!) with elegant, customizable details—perfect for high school, college, or university graduations 🎓🎂.
Graduation Year Cake
Prep Time: 2 hours (plus baking/cooling)
Decorating Time: 2–3 hours
Serves: 12–20
Ingredients:
Cake Base:
- 3-layer round or square cake (8” or 9”, vanilla, chocolate, or marble)
- Buttercream frosting (tinted in school colors or classic white)
- Fondant (black, gold, silver, or school colors for accents)
- Edible metallic paint or luster dust (gold/silver)
Decorations:
- Fondant or wafer paper “2025” plaque (large, as a topper or tier accent)
- Edible ink printer (optional, for school logos or custom designs)
- Graduation-themed fondant shapes: mini caps, diplomas, stars
- Sprinkles or edible glitter (in school colors)
- Gold/silver dragées (for metallic accents)
Design Steps:
- Bake & Frost the Cake:
- Bake and cool layers. Stack with buttercream filling. Crumb coat and chill for 30 minutes.
- Apply a smooth final coat of buttercream. Use school colors for ombre, stripes, or a sleek white finish.
- Create the Year Accent:
- Fondant Plaque: Roll fondant into a rectangle (8×4”). Cut out “2025” with a stencil or freehand. Paint edges with edible gold/silver.
- 3D Numbers: Mold fondant or rice cereal treats into 3D numbers, cover in fondant, and paint.
- Light-Up Numbers: Insert LED tea lights behind fondant numbers for a glowing effect (non-edible).
- Add Academic Details:
- Pipe graduation caps and diplomas in buttercream along the cake’s sides.
- Attach fondant mini caps, scrolls, or stars using edible glue.
- For a personal touch, add the graduate’s name or school motto in piped script.
- Incorporate School Colors:
- Use buttercream stripes, fondant ribbons, or ombre layers in the graduate’s school colors.
- Scatter coordinating sprinkles or dragées around the base or top tier.
- Top It Off:
- Place the “2025” plaque front and center. Surround with fondant caps, diplomas, or a fondant graduation gown figurine.
Customization Ideas:
- University Pride: Add a fondant mascot (e.g., an owl, bulldog) or edible print of the school logo.
- Kindergarten Grad: Use bright colors, cartoonish numbers, and playful fondant crayons/apples.
- PhD Celebration: Label tiers with “B.A.,” “M.A.,” and “PhD” in fondant.
- Photo Cake: Print an edible image of the graduate in their cap and gown.
Pro Tips:
- Stability: For tiered cakes, use dowels or cake boards between layers.
- Edible Ink: Print “Class of 2025” or school mottos on fondant with edible ink markers.
- Glow Effect: Brush “2025” with edible luminescent dust for a subtle glow under UV light.
- Allergy-Friendly: Use vegan buttercream and gluten-free cake layers if needed.
Serving Suggestions:
- Pair with graduation cap cookies or diploma-shaped brownies.
- Display on a cake stand draped with a tassel garland or mini graduation caps.
This cake is a timeless way to honor the graduate’s hard work and achievements. Whether minimalist or extravagantly decorated, the focal year makes it a heartfelt keepsake for their special day! 🎉📅
Image idea: A sleek white tiered cake with a gold fondant “2025” plaque, buttercream graduation caps, and navy/silver school-color accents.
Commemorate 2025 (or the graduate’s corresponding year) with an extravagant statement cake that’s stacked into the shape of the graduate’s graduation year. Mix and match bright fondant and buttercream decorations in their favorite school colors or celebrate the day with caps, diplomas and bursts of fireworks.
Photo Memory Cake
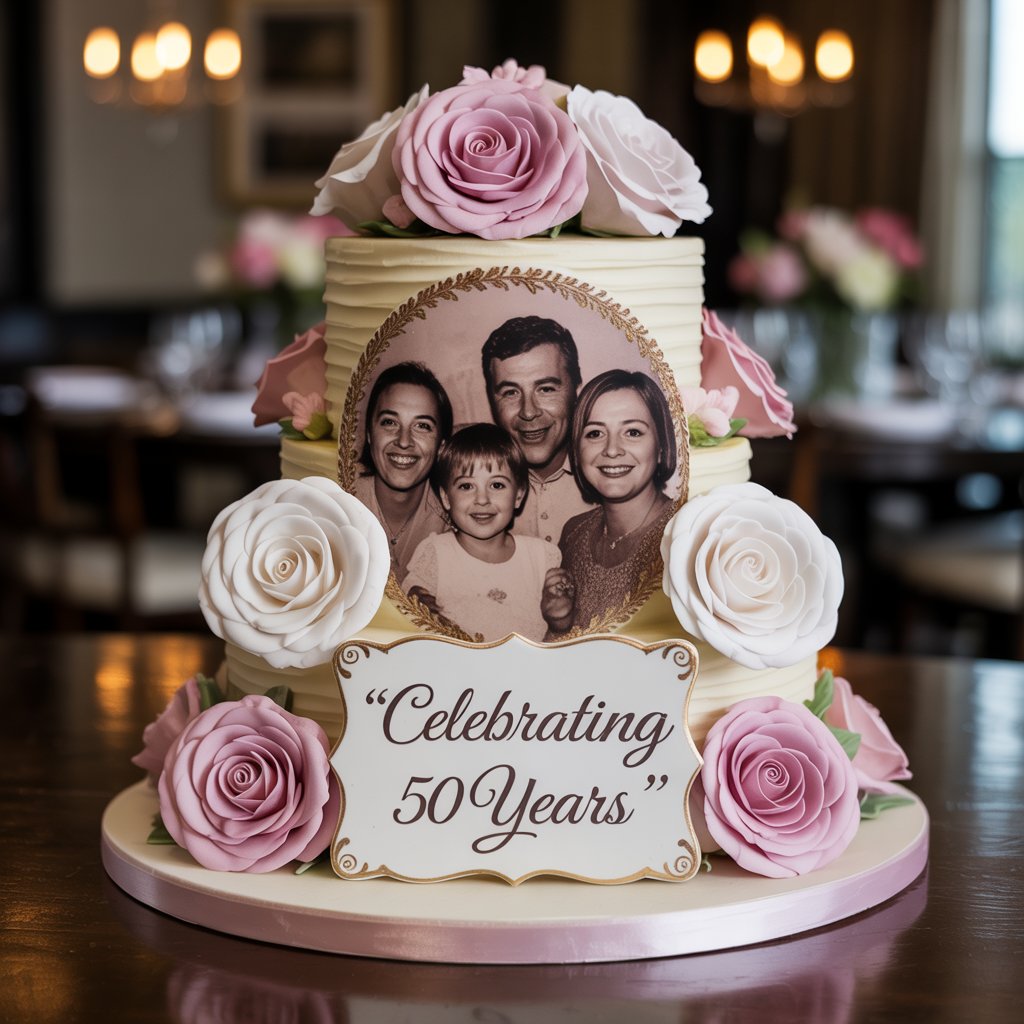
Here’s a heartfelt Photo Memory Cake design that beautifully incorporates cherished photographs into a celebratory dessert—perfect for birthdays, anniversaries, retirements, or memorials. This cake transforms edible images into edible art, creating a personalized keepsake 🎂📸💖.
Photo Memory Cake
Prep Time: 2 hours (plus baking/cooling)
Decorating Time: 1–2 hours
Serves: 12–20
Ingredients:
Cake Base:
- 3-layer round or square cake (vanilla, chocolate, or lemon)
- Buttercream frosting (smooth finish, light colors like white or pastel)
- Fondant (optional, for borders or accents)
Edible Photo Essentials:
- Edible ink printer (and compatible edible paper)
- Edible image sheets (frosting-safe, like Icing Images®)
- Edible glue (or light corn syrup)
Decorations:
- Fondant frames, flowers, or borders (to complement the photos)
- Edible glitter or gold leaf (for elegance)
- Fresh flowers (non-toxic, pesticide-free)
- Personalized fondant toppers (names, dates, or symbols)
Design Steps:
- Bake & Frost the Cake:
- Bake and cool layers. Stack with buttercream filling. Apply a smooth crumb coat and chill for 30 minutes.
- Frost the cake with a final layer of white or pastel buttercream (avoid dark colors that could clash with photos).
- Print the Edible Photo(s):
- Use an edible ink printer to print high-resolution images onto frosting-safe paper. Trim excess paper around the photos.
- Pro Tip: Mirror flip text-heavy images (like invitations) before printing!
- Apply the Photo(s):
- Lightly brush the back of the edible image with edible glue or corn syrup.
- Gently press the photo onto the cake, smoothing out air bubbles with a clean, dry brush.
- For a multi-photo collage, arrange smaller images on fondant plaques or tiers.
- Add Complementary Decor:
- Frame photos with piped buttercream borders, fondant flowers, or gold leaf accents.
- Add fondant details like hearts, stars, or dates (e.g., “Est. 1995” for an anniversary).
- Top with fresh flowers or a fondant keepsake (e.g., a camera, clock, or wedding rings).
- Personalize with Text:
- Pipe messages like “Forever in Our Hearts,” “Celebrating 50 Years,” or “Happy Retirement!”
- Use edible ink markers to write names or dates directly on fondant plaques.
Customization Ideas:
- Anniversary: Print wedding photos and pair with fondant roses.
- Memorial: Feature a loved one’s portrait with angel wings or a fondant dove.
- Baby’s First Birthday: Collage monthly milestone photos.
- Graduation: Include class photos and a fondant cap/diploma.
Pro Tips:
- Photo Quality: Use high-resolution images (300+ DPI) for crisp prints.
- Timing: Apply photos 1–2 hours before serving to prevent moisture damage.
- Safety: Ensure fresh flowers are non-toxic (e.g., roses, violets, orchids) and stemmed with floral tape.
- Allergies: Skip fresh flowers for allergy-prone guests; use fondant blooms instead.
- Backup Plan: If printing fails, use a frosting transfer sheet to hand-trace designs.
Alternative Options:
- Fondant Photo Plaques: Print images on edible paper and attach to fondant rectangles.
- Edible Ink Pens: Draw or write directly onto fondant.
- 3D Photo Frame Topper: Create a fondant “frame” around the image.
Serving Suggestions:
- Pair with photo cookies or cupcakes topped with mini edible images.
- Display alongside a memory board or slideshow of the featured photos.
This cake is more than a dessert—it’s a nostalgic centerpiece that sparks joy and storytelling. Whether honoring a milestone or celebrating a life, it’s a sweet way to relive precious memories 🕊️✨.
Image idea: A white fondant-covered cake with a vintage-style edible photo of a couple, framed by sugar roses and a gold script “50 Years of Love.”
Commend the graduate’s greatest moments with an edible photo cake. You might want to consider using a picture of their senior portrait, a favorite group photos or photos that include their time throughout high school. Thanks to edible photo printing, you can celebrate your loved one in a meaningful and tasty way.
Why It Works:
It’s a cake that prompts conversation and serves as an inspiring trip down memory lane.
Destination or College-Themed Cake
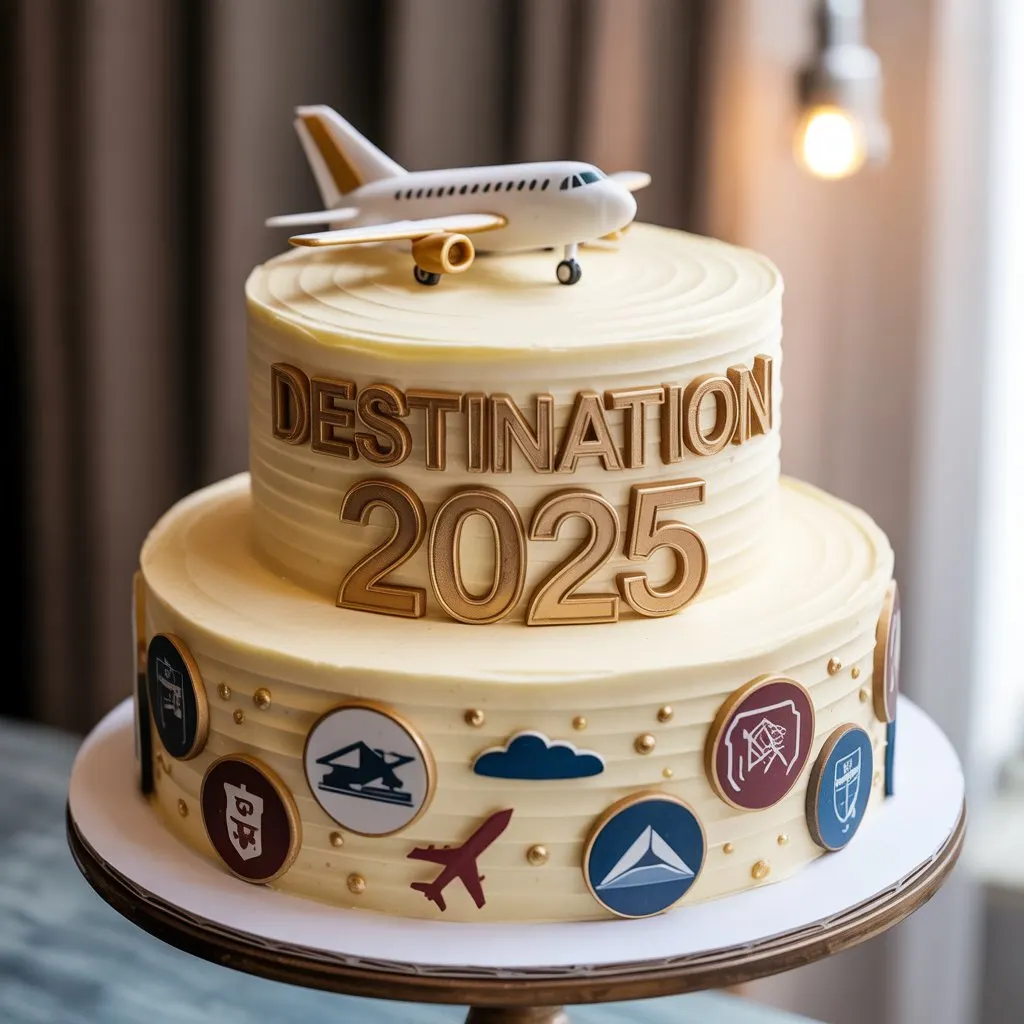
Here’s a Destination or College-Themed Cake design that’s perfect for celebrating college acceptances, graduations, study abroad adventures, or relocations! This customizable cake combines school pride and wanderlust into a delicious, eye-catching centerpiece 🎓✈️🌍.
Destination or College-Themed Cake
Prep Time: 2 hours (plus baking/cooling)
Decorating Time: 3–4 hours
Serves: 12–20
Ingredients:
Cake Base:
- 3-layer round or tiered cake (vanilla, chocolate, or marble)
- Buttercream frosting (tinted in school colors or destination-inspired hues)
- Fondant (colors for landmarks, suitcases, or school mascots)
- Edible ink printer (for logos/maps)
Decorations:
- Fondant landmarks (e.g., Eiffel Tower, Statue of Liberty, college bell tower)
- Edible images (school logo, city skyline, or world map)
- Mini fondant suitcases, airplanes, or globes
- Edible metallic paint (gold/silver for accents)
- Sprinkles (in school colors or themed shapes like stars/compasses)
Design Ideas:
1. College Pride Tier:
- School Colors: Frost tiers in the graduate’s university colors (e.g., crimson for Harvard, blue and gold for UCLA).
- Mascot Topper: Mold the school mascot in fondant (e.g., a bulldog for Yale, a gator for UF).
- Campus Landmarks: Create fondant replicas of iconic buildings, like a library dome or football stadium.
- Class Year: Pipe “Class of 2025” or add a fondant plaque with the graduation year.
2. Wanderlust Tier:
- Edible Map: Print a world map or city skyline on edible paper and wrap around a tier.
- Landmark Sculptures: Craft fondant or chocolate landmarks (e.g., Paris’s Eiffel Tower, NYC’s skyline).
- Suitcase & Passport: Make mini fondant suitcases labeled with the destination city or country.
- Airplane Topper: Shape fondant into a plane with a banner reading “Next Stop: [Destination]!”
3. Hybrid Design:
- Split Cake: One side decorated with school colors/mascot, the other with a destination theme.
- Luggage Tags: Add fondant tags with school initials and destination city (e.g., “Harvard → London”).
Step-by-Step Assembly:
- Bake & Frost:
- Bake layers and cool. Stack with buttercream filling. Crumb coat and chill.
- Apply a smooth base coat of buttercream in school colors or neutral tones (white/gray for maps).
- Add Edible Images:
- Print and apply edible images of the school logo, city skyline, or world map. Smooth carefully to avoid wrinkles.
- Fondant Details:
- Sculpt landmarks, suitcases, or mascots. Use edible glue to attach them to the cake.
- Pipe buttercream borders to frame edible images or tiers.
- Personalize:
- Pipe the graduate’s name, degree, or destination city in buttercream script.
- Add fondant symbols tied to their major (e.g., a paint palette for art, scales for law).
- Finishing Touches:
- Brush landmarks with edible gold/silver luster dust for a metallic finish.
- Scatter school-color sprinkles or compass-shaped candies around the base.
Customization Tips:
- Study Abroad Theme: Add flags of the destination country and fondant postage stamps.
- Sorority/Fraternity Pride: Incorporate Greek letters and crests in fondant.
- Travel Journal Cake: Design tiers to look like stacked journals with fondant “pages” and travel stickers.
- Minimalist Design: Opt for a sleek white cake with a single fondant airplane and subtle map details.
Pro Tips:
- Stability: Use dowels or cake boards for tiered designs.
- Edible Ink: Print multiple copies of edible images in case of tears.
- Non-Edible Option: Add a small toy airplane or souvenir as a topper (remove before serving).
- Allergies: Use vegan buttercream or gluten-free cake mix if needed.
Serving Suggestions:
- Pair with cookies shaped like graduation caps, airplanes, or mini globes.
- Display on a cake stand draped with a scarf in school colors or a vintage map.
This cake is a heartfelt way to honor both academic achievements and exciting new journeys! Whether they’re off to college or exploring the world, it’s a sweet symbol of pride and adventure 🌟📚✈️.
Image idea: A two-tier cake with a navy-and-gold college tier (featuring a fondant mascot) and a travel-themed tier with an edible Paris skyline and fondant suitcase.
Design a cake based on what’s next — maybe to the college they’re attending or the next adventure they’ll embark on. For collegebound students, cakes could feature school logos, mascots or custom message, such as “Off to Yale!” For travel enthusiasts, there’s the globe-shaped cake or suitcases decorated with edible travel stickers.
Creative Suggestion:
Drop in a fondant map of where they are going next with a dotted line.
Letter or Initial Monogram Cake
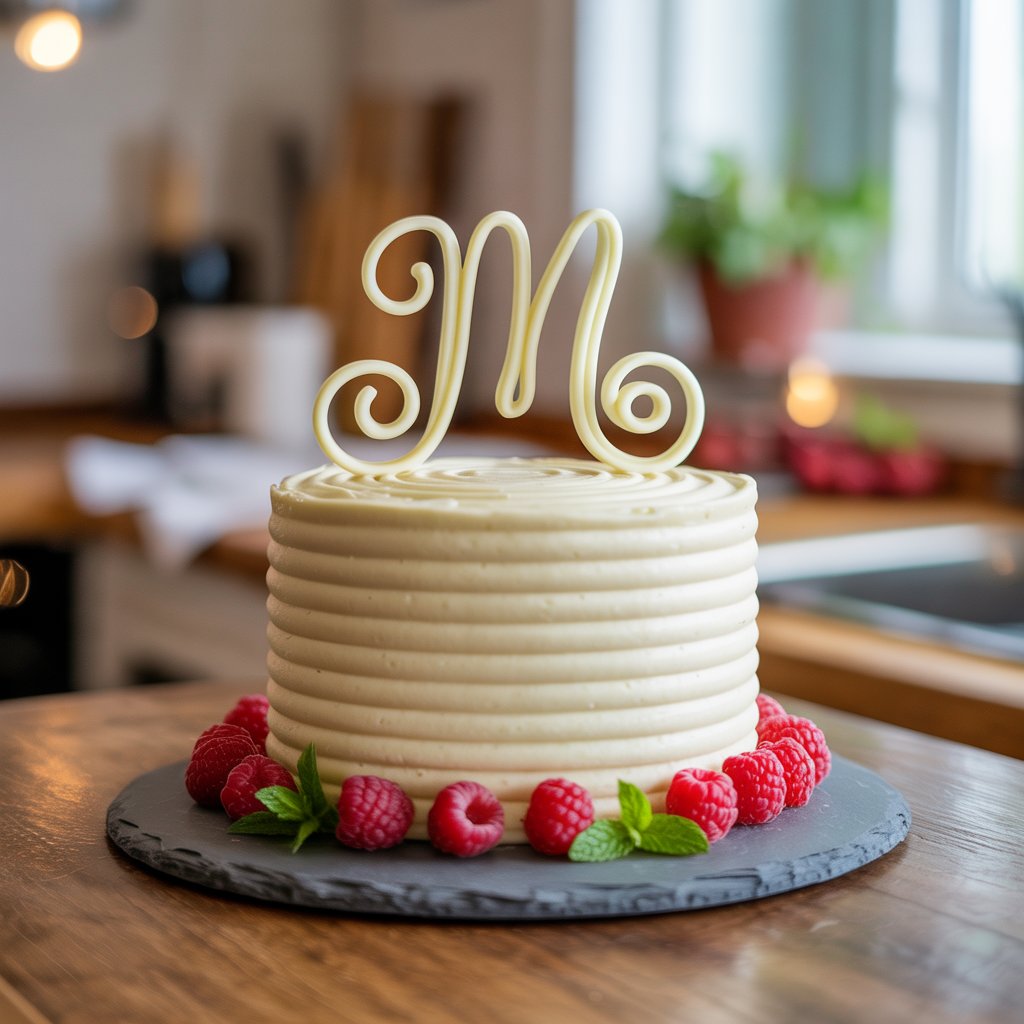
Here’s an elegant Letter or Initial Monogram Cake design, perfect for birthdays, weddings, anniversaries, or any occasion celebrating a name or milestone. This cake combines timeless sophistication with personalization, making it a stunning centerpiece 🎂✨.
Letter or Initial Monogram Cake
Prep Time: 2 hours (plus baking/cooling)
Decorating Time: 2–3 hours
Serves: 12–16
Ingredients:
Cake Base:
- 3-layer round or square cake (8″ or 9″, vanilla, chocolate, or lemon)
- Buttercream frosting (smooth or textured, in your chosen color palette)
- Fondant (white, gold, silver, or metallic for the monogram)
Decorations:
- Edible metallic paint or luster dust (gold, rose gold, or silver)
- Piping gel or edible glue
- Sprinkles (pearls, sequins, or geometric shapes)
- Fresh flowers or fondant blooms (optional, for accents)
Tools:
- Monogram stencil (printable template or purchased)
- Exacto knife or fondant cutter
- Piping tips (round, star, or petal)
- Edible ink markers (for hand-drawn details)
Design Steps:
- Bake & Frost the Cake:
- Bake and cool layers. Fill and stack with buttercream. Apply a smooth crumb coat and chill for 30 minutes.
- Frost the cake with a final layer of buttercream (e.g., soft pastel for weddings, bold hues for birthdays). Use a bench scraper or spatula for a sleek finish.
- Create the Monogram:
- Fondant Letter:
- Roll fondant to ¼-inch thickness. Use a stencil or freehand cut a large letter (e.g., “A,” “M”) with an Exacto knife.
- Paint the letter with edible metallic luster dust mixed with vodka or lemon extract for shine. Let dry.
- Piped Buttercream Letter:
- Use a round tip to pipe the initial in buttercream. For dimension, outline first, then fill.
- Attach the Monogram:
- Brush the back of the fondant letter with piping gel or edible glue. Press gently onto the cake’s front or top tier.
- For buttercream letters, pipe directly onto the chilled cake.
- Add Accents:
- Piped Details: Frame the monogram with buttercream swirls, rosettes, or geometric patterns.
- Edible Embellishments: Press metallic sprinkles or pearls around the base.
- Floral Touches: Nestle fresh flowers (e.g., roses, peonies) or fondant blooms near the monogram.
- Personalize:
- Pipe names, dates, or phrases like “Est. 2020” or “Happy 30th!” around the cake.
- Use edible ink markers to add delicate scrollwork or dots to the fondant letter.
Customization Ideas:
- Wedding Elegance: White fondant monogram on a marble-textured cake with gold leaf and fresh orchids.
- Birthday Fun: Bright rainbow buttercream with a glittery fondant initial and confetti sprinkles.
- Anniversary Romance: Intertwined initials (“J + A”) in rose gold fondant atop a red velvet cake.
- Corporate Event: Sleek black fondant letter on a white fondant cake with geometric silver accents.
Pro Tips:
- Stencil Shortcut: Print a letter on paper, place it over fondant, and trace with a toothpick before cutting.
- Stability: For heavy fondant letters, insert a toothpick or dowel through the center into the cake.
- Texture Play: Use a textured rolling pin (e.g., linen pattern) on fondant for a subtle backdrop.
- Allergy-Friendly: Use vegan buttercream and gluten-free cake layers.
Serving Suggestions:
- Pair with monogram cookies or mini cupcakes featuring smaller initials.
- Display on a cake stand draped with greenery or a ribbon matching the color scheme.
This cake is a timeless way to honor someone’s identity or milestone. Whether minimalist or lavishly decorated, the monogram adds a deeply personal touch that guests will adore 💝📜.
Image idea: A blush-pink buttercream cake with a gold fondant “S” monogram, surrounded by white roses and pearl sprinkles.
Keep it chic and personal with a monogram cake emblazoned with the graduate’s initials. You could also do this simple design in one of the popular metallic finishes like rose gold or silver, with some fresh flowers or a scattering of sprinkles for a fresh and stylish party cake.
Pairing Ideas:
Pair with matching cupcakes for smaller servings or as a takeaway.
Sports or Extracurricular Activity Cake
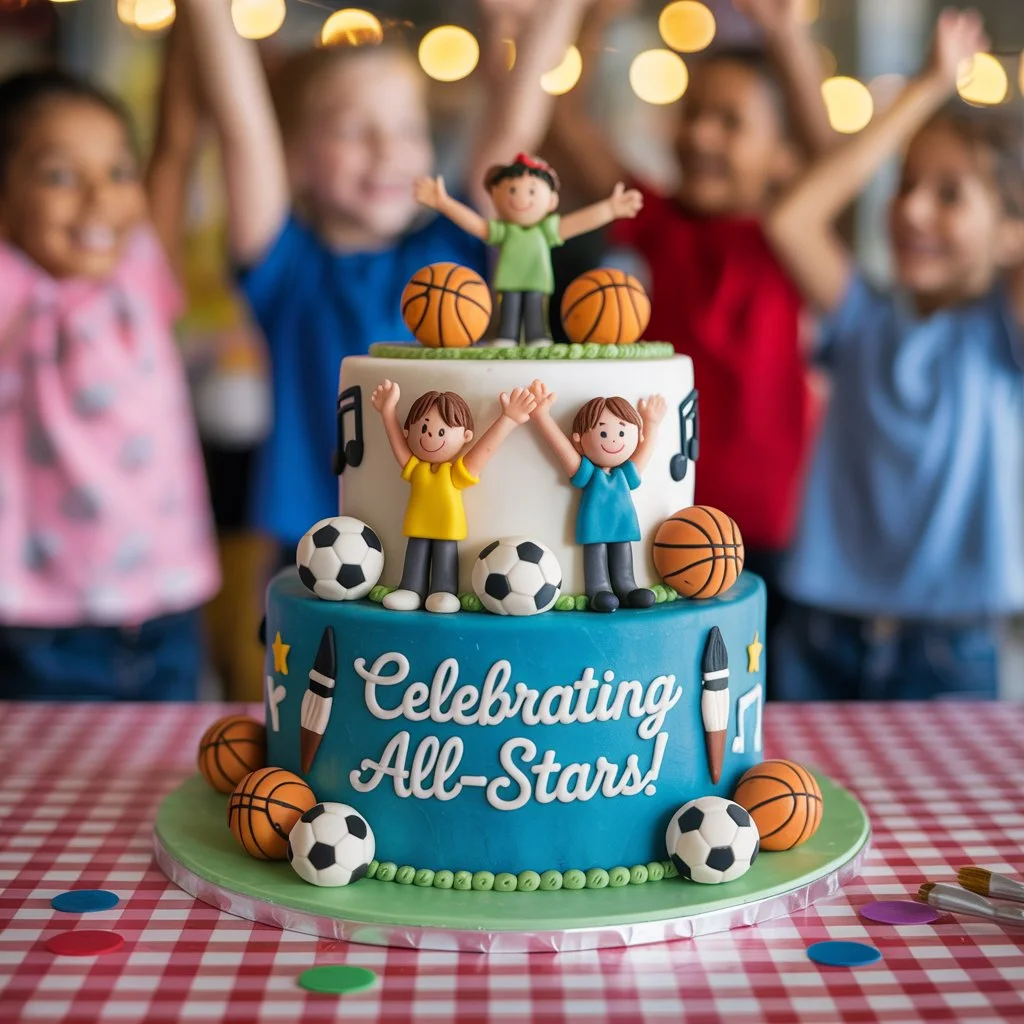
Here’s a dynamic Sports or Extracurricular Activity Cake design that celebrates a passion for athletics, arts, or hobbies! Perfect for team parties, end-of-season celebrations, birthdays, or milestone achievements—this cake is customizable for any activity, from soccer to ballet to chess 🏀🩰🎻.
Sports or Extracurricular Activity Cake
Prep Time: 2 hours (plus baking/cooling)
Decorating Time: 2–4 hours
Serves: 12–20
Ingredients:
Cake Base:
- 3-layer round or sheet cake (vanilla, chocolate, or funfetti)
- Buttercream frosting (tinted in team/activity colors)
- Fondant (assorted colors for equipment, jerseys, or symbols)
Decorations:
- Edible images (team logo, musical notes, or activity-specific graphics)
- Edible ink markers (for details like jersey numbers or signatures)
- Sprinkles (sports-themed shapes: balls, stars, trophies)
- Candy melts (to mold mini equipment, e.g., soccer balls, ballet shoes)
- Toothpicks or dowels (for structural support)
Design Ideas:
1. Sports-Themed Cake:
- Field/Court Design: Frost the cake to resemble a soccer field (green buttercream with white piped lines), basketball court (orange fondant with black lines), or baseball diamond.
- 3D Equipment: Mold fondant into sports gear (e.g., fondant basketball hoop, volleyball net, hockey stick).
- Jersey Topper: Create a mini fondant jersey with the player’s name and number.
- Trophy Tier: Stack a gold-fondant trophy on top with “Champions 2024” piped on the base.
2. Arts/Activities Cake:
- Ballet/Dance: Pale pink tiers with fondant ballet shoes, tiaras, and buttercream tutu ruffles.
- Music: Black-and-white piano key design with fondant instruments (violin, guitar, music notes).
- Chess/STEM: Checkerboard cake with fondant chess pieces or edible robot/atom symbols.
- Theater: Fondant drama masks, marquee lights, or a “curtain” buttercream drape.
3. General Extracurricular Design:
- Collage Style: Use edible images of the activity (e.g., a dancer mid-leap, a soccer team photo).
- Medal Accents: Fondant or chocolate medals with ribbons in team colors.
- Activity Symbols: Pipe buttercream art supplies (paintbrushes), books, or science beakers.
Step-by-Step Assembly:
- Bake & Frost:
- Bake and cool layers. Stack with buttercream filling. Crumb coat and chill.
- Apply a base layer of buttercream in the team/activity’s primary color (e.g., green for soccer, purple for dance).
- Add Activity-Specific Details:
- For Sports:
- Pipe white buttercream lines for field/court markings.
- Attach fondant equipment (balls, bats) with edible glue.
- Add edible images of team logos or player silhouettes.
- For Arts:
- Create fondant instruments or paint palettes.
- Use edible glitter for a “sparkly stage” effect.
- For Academic Clubs:
- Pipe equations, chess boards, or robotics motifs.
- Personalize:
- Pipe the participant’s name, team name, or “MVP 2024” in buttercream.
- Use edible markers to sign the cake with teammates’ names or autographs.
- Top It Off:
- Place a fondant figurine (e.g., a dancer, athlete, or chess queen) on the top tier.
- Add a trophy, medal, or fondant ribbon banner with the activity name.
Customization Tips:
- Team Colors: Match buttercream and fondant to jerseys or uniforms.
- Mini Champions: For kids, add cartoonish fondant athletes or animals in gear.
- Glow-in-the-Dark: Mix edible luminescent powder into fondant for a “night game” football cake.
- Tiered Achievements: Label tiers with past, present, and future goals (e.g., “Rookie Season,” “All-Star 2024”).
Pro Tips:
- Stability: Use dowels or straws to support heavy fondant toppers.
- Edible Images: Print on frosting-safe paper and apply just before serving to avoid moisture damage.
- Quick Fix: Use pre-made candy decorations (e.g., chocolate soccer balls, gummy ballet slippers).
- Allergy-Friendly: Substitute with vegan buttercream or gluten-free cake mix.
Serving Suggestions:
- Pair with sports ball cupcakes or activity-themed cookies (e.g., cleats, pianos, paintbrushes).
- Display on a cake stand decorated with mini trophies, ribbons, or equipment.
This cake is a fun, personalized way to honor hard work and dedication—whether they’re scoring goals, nailing pirouettes, or mastering chess strategies! 🏆🎨⚽
Image idea: A two-tier soccer cake with green buttercream “grass,” fondant soccer ball topper, and piped jersey numbers with the player’s name.
STUDENT INTERESTS Is your graduate your school’s standout quarterback, a gifted musician or a drama kid? Commemorate their accomplishments with a cake based on what they know and love. A football cake, a piano-key decorated design or a stage inspired cake with edible props will serve as an ideal tribute to their interests.
Extra Flair:
Add fondant medals or trophies to express their personality and achievements.
Minimalist Naked Cake
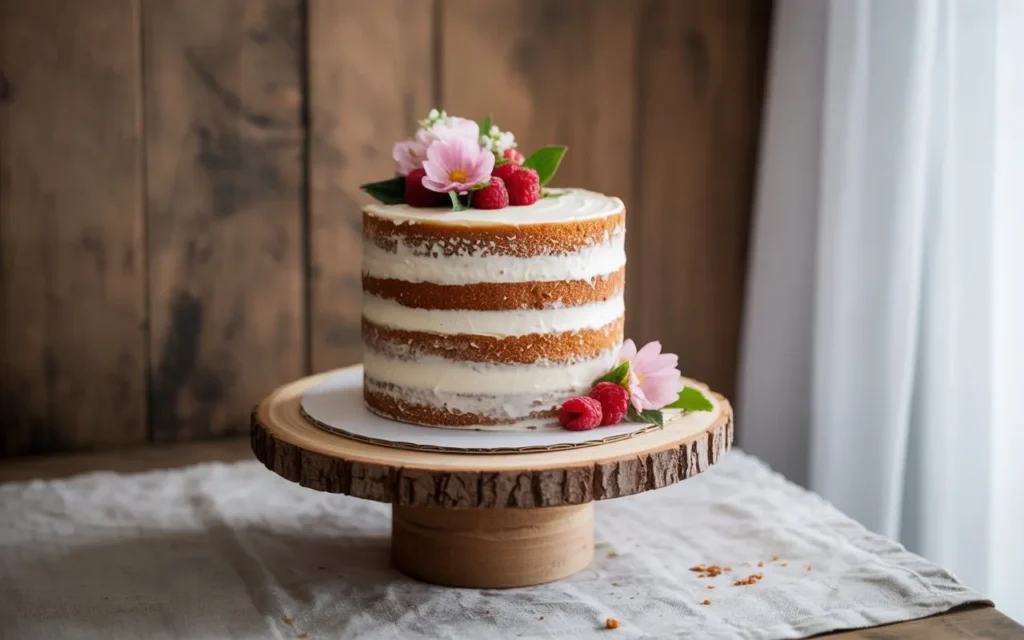
Here’s an elegant Minimalist Naked Cake design that celebrates simplicity with its rustic, unfrosted sides and delicate natural accents. Perfect for weddings, birthdays, or any occasion where understated beauty shines 🍰✨.
Minimalist Naked Cake
Prep Time: 2 hours (plus baking/cooling)
Decorating Time: 30 minutes
Serves: 10–12
Ingredients:
Cake Layers:
- 3-layer vanilla, chocolate, or lemon cake (6″ or 8″ rounds for a tall, dramatic look)
- Simple syrup (optional, for moisture: ½ cup water + ½ cup sugar, heated until dissolved)
Filling/Frosting:
- 1½ cups lightly sweetened whipped cream (stabilized with 1 tbsp powdered sugar + 1 tsp cornstarch)
- OR Swiss meringue buttercream (for a slightly frosted look)
- Fresh fruit (berries, figs, or citrus slices)
- Edible flowers (e.g., roses, pansies, lavender)
Optional Accents:
- Dusting of powdered sugar
- Fresh herbs (mint, thyme, or rosemary)
- Naked drip (a thin drizzle of caramel or chocolate)
Design Steps:
- Bake & Prep Layers:
- Bake and cool cake layers. Level the tops for even stacking.
- Optional: Brush layers with simple syrup to keep them moist (ideal for drier cakes like vanilla).
- Assemble with Minimal Frosting:
- Place the first layer on a cake stand. Spread a thin layer of whipped cream or buttercream (just enough to fill gaps).
- Add fresh fruit (e.g., sliced strawberries, raspberries) in a single layer.
- Repeat with remaining layers.
- Crumb Coat (Optional):
- Apply a barely-there crumb coat to seal in crumbs, leaving the sides mostly exposed. Chill for 15 minutes.
- Decorate with Nature:
- Press edible flowers or herbs gently into the frosting between layers or on top.
- Arrange fresh fruit (whole figs, blackberries, or citrus wheels) in a loose, organic cluster on the top tier.
- Finishing Touches:
- Dust the top lightly with powdered sugar for a snowy effect.
- Add a naked drip by drizzling melted chocolate or caramel sparingly over the edges.
Customization Ideas:
- Seasonal Twist: Use pomegranate seeds in winter, peaches in summer, or edible autumn leaves.
- Monochromatic: Stick to one color palette (e.g., all-white with white flowers and pear slices).
- Textured Layers: Add a sprinkle of crushed nuts or toasted coconut between tiers.
- Geometric Minimalism: Use clean lines with sliced fruit (e.g., alternating kiwi and strawberry disks).
Pro Tips:
- Stability: Use a dense cake recipe (e.g., pound cake) to support the weight of fresh fruit.
- Freshness: Decorate just before serving to prevent flowers from wilting or fruit from bleeding.
- Allergy-Friendly: Substitute dairy with coconut whipped cream and gluten-free cake layers.
- Less Is More: Avoid overcrowding decorations—3–5 focal points (e.g., one large flower + a few berries) keep it chic.
Serving Suggestions:
- Pair with mini naked cupcakes or macarons for a dessert table.
- Display on a wooden cake stand with greenery or linen napkins for a rustic vibe.
This cake is a celebration of natural beauty and flavor. Its simplicity lets the quality of ingredients shine, making it perfect for intimate gatherings or Pinterest-worthy moments 🌿🌸.
Image idea: A tall 3-tier vanilla naked cake with fresh raspberries between layers, a single white peony on top, and a dusting of powdered sugar.
If you’re heading for simplicity go for a pretty decorated naked cake. These cakes are low-icing, so that you can see the layers of sponge and filling through. Toss in fresh flowers, ”A big Conratulations!” topper, and dust the top with powdered sugar or edible glitter for a classy look.
Great For:
Graduations in the open air, or casual events with an elegant edge.
Cupcake Tower or Pull-Apart Cake
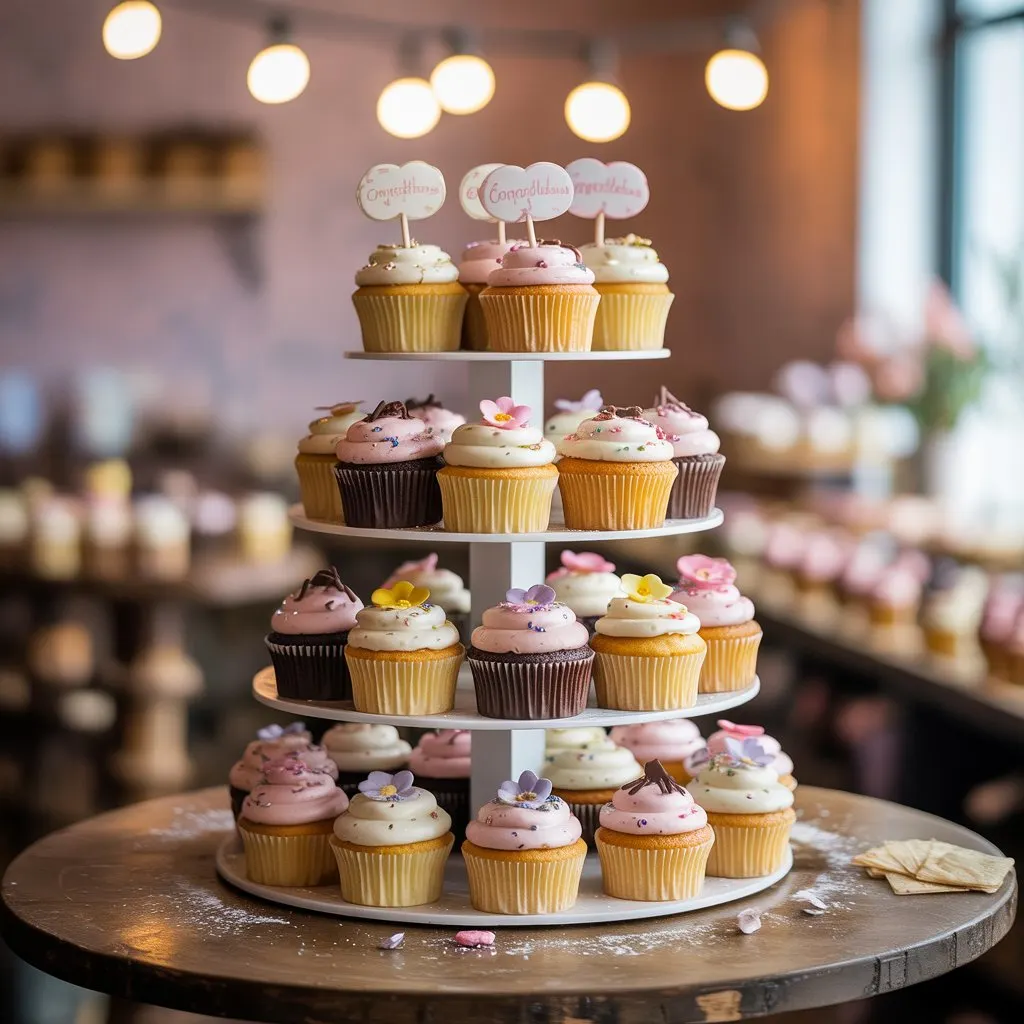
Here’s a versatile Cupcake Tower or Pull-Apart Cake design that combines the convenience of individual servings with the wow factor of a cohesive centerpiece. Perfect for birthdays, weddings, baby showers, or parties where guests can “pull apart” slices or grab cupcakes with ease! 🧁✨
Cupcake Tower vs. Pull-Apart Cake
Prep Time: 1–2 hours (plus baking/cooling)
Serves: 12–24 (depending on size)
Cupcake Tower Design
Ingredients:
- 24–36 cupcakes (vanilla, chocolate, or funfetti)
- Buttercream frosting (tinted to match your theme)
- Cupcake stand (tiered, rotating, or DIY with cake boards and dowels)
- Decorations:
- Sprinkles, edible glitter, fresh flowers, or fondant toppers
- Optional: Macarons, cookies, or cake pops for accent tiers
Assembly:
- Bake & Frost:
- Bake cupcakes and let cool. Pipe swirls of buttercream using a star tip.
- Create the Tower:
- Arrange cupcakes on tiered stands. For stability, use a sturdy base (e.g., a cake dummy on the bottom tier).
- Decorate:
- Add themed toppers (e.g., fondant flowers, mini flags, or chocolate shards).
- Use fresh blooms or greenery between cupcakes for a garden-party vibe.
- Add Height:
- Top the tower with a small cake, a bouquet of balloons, or a custom topper (e.g., “Happy Birthday” sign).
Best For: Weddings, large gatherings, or events where guests can grab individual servings.
Pull-Apart Cake Design
Ingredients:
- 1 sheet cake (9×13” or larger, any flavor)
- Buttercream frosting (for “glue” and decorating)
- Shape Template: Heart, number, letter, or geometric design
- Decorations:
- Sprinkles, candy melts, fresh fruit, or edible paint
Assembly:
- Bake & Chill:
- Bake and cool the sheet cake. Freeze for 30 minutes for cleaner cuts.
- Cut Shapes:
- Use cookie cutters or a knife to cut the cake into uniform shapes (squares, circles, hearts, etc.).
- Assemble:
- Arrange pieces into your desired shape (e.g., a giant “30” for a birthday). “Glue” them together with buttercream.
- Frost & Decorate:
- Spread a thin crumb coat over the entire structure. Add final frosting and decorate with piped details, drips, or edible glitter.
- For a cupcake pull-apart cake, bake cupcakes and arrange them tightly in a shape (e.g., a Christmas tree), then frost as one unit.
Best For: Themed parties, milestone celebrations, or interactive desserts with a fun reveal!
Customization Ideas:
- Baby Shower: Pull-apart onesie shape with pastel ruffles.
- Graduation: Cupcake tower with grad-cap toppers and school-color sprinkles.
- Holiday: Pull-apart tree or snowflake with peppermint candies.
- Wedding: Naked cupcake tower with fresh roses and gold leaf.
Pro Tips:
- Stability: For tall cupcake towers, use dowels or a central support rod.
- Portion Control: Pull-apart cakes simplify serving—no slicing needed!
- Make-Ahead: Bake cupcakes/cake a day ahead; frost day-of for freshness.
- Allergy-Friendly: Use vegan frosting or gluten-free batter.
Serving Suggestions:
- Pair with a mini dessert bar (cake pops, cookies) for variety.
- Label tiers or shapes with edible markers (e.g., “Eat Me!” for a whimsical touch).
Whether you choose a cupcake tower’s elegance or a pull-apart cake’s playful charm, both designs guarantee a stunning, crowd-friendly treat! 🎉🍰
Image idea: A pull-apart “HELLO 30” number cake with buttercream swirls and gold sprinkles, or a cupcake tower adorned with cascading fresh berries and mint leaves.
A cupcake tower is ideal for large parties, where you must combine treats with decor. Place cupcakes into a formation such as a graduation cap, diploma or graduation year, and create each one to be a mini work of edible art. Guests will enjoy being able to pick up their treat without a knife and fork.
Fun Twist:
Have a variety of flarvors ranging from chocolate, red-velvet and vanilla since not everyone likes the same taste.
Which Design Will You Pick?
Each of these graduation cake ideas is full of its own personality, and what you ultimately decide on will be based on your graduate’s personality, accomplishments, and personal preferences. Whether you choose an over-the-top sports theme or a simple naked cake, the goal is to make it personal and honor this amazing accomplishment.
Need a professional hand to give shape to your cake ideas? Talk to a local bakery, or see if they have any custom cake designers in your area who can make your vision come true.
FAQ
A: Please allow 2-3 weeks notice to order your graduation cake. More complex layouts, or to be delivered during the peak graduation season, consider closer to 14 days to secure your party package.
A: Yes, most bakeries and custom cake designers offer full customization of both flavors, fillings and decorations. Check out any ideas that you have with your baker.
plan a menu that offers options and clearly labels dishes with allergens and restrictions
You’ll want to communicate these preferences when you order.
A: Cakes are best stored in a cool, dry place away from direct sunlight. If the cake has any perishable fillings the refrigerator may need to be used. Ask your baker for individual storage direction.
A: That depends on the amount of people you will be serving. Discuss with your baker what size (or sizes if choosing tiered) you will need to accommodate your guest number.
Leave a Reply